Are you ready to embark on a rewarding journey of hatching your own chicks? Whether you're a seasoned poultry enthusiast or a curious beginner, this ultimate guide is here to help you successfully use an egg incubator. Hatching chicks from eggs is a fascinating and fulfilling experience that allows you to witness the miracle of life first hand. With the right knowledge, tools, and a little bit of patience, you can create the ideal environment for your eggs to hatch and watch as adorable chicks peck their way into the world. In this comprehensive guide, we'll walk you through each step of the incubation process, from selecting the right incubator and setting it up correctly, to monitoring temperature and humidity, candling the eggs, and ensuring a smooth transition for the newly hatched chicks. Get ready to embark on a journey of discovery and joy as we delve into the art of hatching chicks with an egg incubator.
Benefits of using an egg incubator
Using an egg incubator to hatch chicks offers several benefits over natural incubation. Firstly, it allows you to have more control over the entire process. With a good quality incubator, you can maintain precise temperature and humidity levels, ensuring optimal conditions for egg development. This control leads to higher hatch rates and healthier chicks. Additionally, using an incubator eliminates the risks associated with natural incubation, such as predators, diseases, and unpredictable weather conditions. It also allows you to hatch chicks throughout the year, regardless of the season, giving you more flexibility in your poultry breeding endeavours.
Another advantage of using an egg incubator is the ability to hatch a variety of poultry species. Whether you're interested in hatching chickens, ducks, quails, or other types of birds, there are incubators available that cater to different species' specific needs. This versatility opens up possibilities for diverse poultry projects and allows you to explore the world of poultry breeding on a larger scale.
Lastly, using an egg incubator provides a unique educational experience. It offers an opportunity to teach children or students about the life cycle of birds and the importance of responsible animal husbandry. Witnessing the hatching process first hand can be a magical and educational experience for people of all ages, fostering a deeper appreciation for nature and the wonders of life.
Types of egg incubators
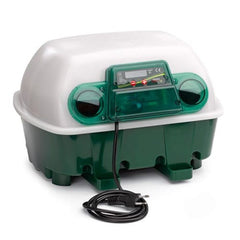
When it comes to egg incubators, there are various types available on the market. The choice of incubator depends on your specific needs, budget, and preferences. Here are the most common types of egg incubators and pictured are the best egg incubators for Australian conditions:
Still-air incubators: Still-air incubators are the simplest and most affordable type of incubator. They rely on natural convection to circulate warm air within the incubator. These incubators typically require manual temperature adjustments and may have limited temperature control accuracy. Still-air incubators are suitable for beginners or hobbyists who are hatching a small number of eggs.
Forced-air incubators: Forced-air incubators, also known as fan-assisted incubators, use a fan to circulate warm air evenly throughout the incubator. This type of incubator provides more consistent temperature and humidity levels, resulting in better hatch rates. Forced-air incubators are recommended for larger-scale hatching projects or individuals who want more control and precision in the incubation process.
Cabinet incubators: Cabinet incubators are larger, more advanced incubators designed for commercial or professional use. These incubators can accommodate a significant number of eggs and offer advanced features, such as automatic turning and temperature control systems. Cabinet incubators are ideal for serious poultry breeders or those looking to hatch large quantities of eggs.
Portable incubators: Portable incubators are compact and lightweight, making them suitable for individuals who need to transport or move their incubators frequently. These incubators are often battery-powered or have a built-in power source, allowing for hatching on-the-go. Portable incubators are popular among breeders who participate in poultry shows or exhibitions.
When choosing an egg incubator, consider factors such as your budget, the number of eggs you plan to hatch, the desired level of control, and the specific needs of the poultry species you want to hatch. It's also advisable to read reviews, seek recommendations from experienced breeders, and invest in a reputable brand to ensure quality and reliability.
Choosing the right egg incubator for your needs
Selecting the right egg incubator is crucial for a successful hatching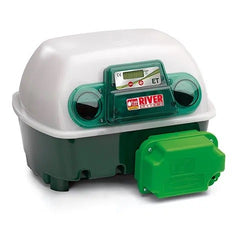 experience. With a wide range of options available, it's important to consider several factors before making a decision.
Capacity: Determine the number of eggs you plan to hatch at a time and choose an incubator that can accommodate your desired quantity. Keep in mind that larger incubators often offer better temperature and humidity control.
Temperature and humidity control: Look for an incubator that provides accurate temperature and humidity control. The ability to maintain consistent levels within the ideal range is essential for proper egg development. Some incubators come with built-in digital controls, while others require manual adjustments.
Automatic turning: Consider whether you want an incubator with automatic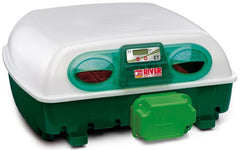 turning capabilities. Automatic turning ensures that the developing embryos receive equal heat distribution, which can improve hatch rates. Some incubators have built-in turning mechanisms, while others require manual turning.
Ease of use: Look for an incubator that is user-friendly and easy to operate. Features such as clear temperature displays, intuitive controls, and easy access to eggs for turning and candling can make the incubation process more convenient.
Quality and durability: Invest in a high-quality incubator that is built to last. Check customer reviews, brand reputation, and warranty information to ensure that you are purchasing a reliable product.
Additional features: Consider any additional features that might be important to you. These could include alarms for temperature or humidity fluctuations, egg candling lights, or built-in ventilation systems.
By carefully considering these factors and evaluating your specific needs, you can choose an egg incubator that aligns with your goals and maximizes your chances of successful hatching.
Preparing the eggs for incubation
Before placing the eggs in the incubator, it's essential to prepare them properly. Follow these steps to ensure the best possible conditions for successful hatching:
1. Egg selection: Choose fresh, clean, and fertile eggs for incubation. Avoid eggs that are cracked, dirty, or unusually shaped. If possible, collect eggs from healthy, disease-free birds.
2. Storage: Store the eggs correctly before incubation. Keep them in a cool, dry place with a temperature of around 50-60°F (10-15°C). Avoid extreme temperature fluctuations and excessive humidity, as these can negatively affect egg viability.
3. Egg turning: Begin turning the eggs at least 2-3 times a day, starting from the second day of storage. Turning helps prevent the embryo from sticking to the shell and promotes even development. If possible, mark one side of each egg with an "X" and the other side with an "O" to keep track of the turning process.
4. Candling: After a week of storage, candle the eggs to check for fertility and embryo development. Candling involves shining a bright light through the egg to observe the contents. Infertile or non-viable eggs can be removed at this stage to prevent contamination and optimize hatch rates.
5. Cleaning: If necessary, gently clean dirty eggs using a soft cloth or fine sandpaper. Be careful not to remove the protective bloom on the eggshell, as it helps prevent bacteria from entering the egg.
By following these steps, you can ensure that only viable and healthy eggs are placed in the incubator, increasing your chances of a successful hatch. Remember to handle the eggs with care to avoid damaging the delicate embryos inside.
Setting up the egg incubator
Properly setting up the egg incubator is crucial for creating an optimal environment for egg development. Follow these steps to ensure a successful setup:
Location: Choose a suitable location for the incubator, away from direct sunlight, drafts, and other temperature fluctuations. It's important to place the incubator on a stable surface that can support its weight.
Cleanliness: Thoroughly clean and disinfect the incubator before use. Remove any dust, dirt, or debris that could harbor bacteria or affect temperature accuracy. Follow the manufacturer's instructions for cleaning and disinfection.
Temperature control: Set the temperature according to the specific requirements of the poultry species you are hatching. Refer to the incubator's manual for recommended temperature settings. Allow the incubator to stabilize at the desired temperature for at least 24 hours before adding the eggs.
Humidity control: Fill the incubator's water reservoir or humidity tray with water according to the manufacturer's instructions. Adjust the water level to achieve the desired humidity level, typically around 50-60%. Monitor the humidity closely throughout the incubation process and make adjustments as necessary.
Thermometer calibration: Calibrate the incubator's thermometer using a reliable thermometer to ensure accurate temperature readings. Place the calibrated thermometer at the same level as the eggs to monitor the temperature inside the incubator accurately.
Egg placement: Carefully place the prepared eggs in the incubator, ensuring they are positioned with the marked side facing up. Avoid overcrowding the incubator, as this can impede proper airflow and heat distribution. Leave enough space between the eggs for easy turning and inspection.
Incubator ventilation: Ensure that the incubator has proper ventilation to allow for the exchange of fresh air. Follow the manufacturer's instructions regarding ventilation settings or openings.
Once the incubator is set up correctly, it's important to monitor the temperature and humidity levels regularly to ensure they remain within the recommended range. Small adjustments may be necessary to maintain optimal conditions throughout the incubation period.
Monitoring temperature and humidity
Temperature and humidity are critical factors that directly impact the success of egg incubation. It's crucial to monitor these parameters closely and make necessary adjustments to maintain optimal conditions. Here's how to effectively monitor temperature and humidity:
Thermometer accuracy: Regularly check the accuracy of the incubator's built-in thermometer by comparing it to a calibrated thermometer. This ensures that you are getting accurate temperature readings.
Temperature fluctuations: Temperature stability is vital for successful egg incubation. Check the temperature inside the incubator at least twice a day, ideally in the morning and evening, and record the readings. Make adjustments to the incubator's temperature control if necessary.
Humidity levels: Use a reliable hygrometer to measure the humidity inside the incubator. Check the humidity levels at least twice a day and adjust the water level in the reservoir or humidity tray accordingly. Maintain a consistent humidity level, as fluctuations can negatively affect egg development.
Ventilation: Ensure that the incubator has proper ventilation to prevent the buildup of excess moisture. Follow the manufacturer's instructions regarding ventilation settings and adjust them if needed.
Monitoring tools: Consider using additional monitoring tools, such as wireless temperature and humidity sensors, to get real-time data and alerts on your smartphone or computer. These tools can provide more accurate and convenient monitoring, especially for larger-scale incubation projects.
By maintaining temperature and humidity within the recommended range and monitoring them regularly, you can create an ideal environment for egg development and maximize your chances of a successful hatch.
Turning the eggs
Turning the eggs during incubation is an essential step that promotes even development and prevents the embryos from sticking to the shell. Here's how to turn the eggs properly:
Frequency: Turn the eggs at least three times a day. The more frequent the turning, the better, as it closely mimics the natural behavior of mother birds.
Turning angles: Turn the eggs by 180 degrees each time, ensuring that each side of the egg faces up and down alternately. This helps prevent one side of the embryo from receiving excessive heat, promoting uniform development.
Turning techniques: There are various ways to turn the eggs, depending on the size and type of incubator. Some incubators have built-in turning mechanisms that automatically rotate the eggs at regular intervals. If you have a manual-turn incubator, you can turn the eggs by hand or use an egg turner specifically designed for this purpose.
Record keeping: Keep a record of the turning schedule to ensure that each egg receives proper care and attention. This can be done by marking an "X" or "O" on each egg to track the turning process.
Remember to handle the eggs with care during turning to avoid jostling or dropping them. Gentle and consistent turning is essential for healthy embryo development and optimal hatch rates.
Caring for the developing chicks
As the eggs continue to develop, it's important to provide proper care to ensure the health and well-being of the growing embryos. Here are some essential aspects of caring for the developing chicks:
Avoid disturbances: Minimise disturbances to the incubator as much as possible. Excessive opening of the incubator can cause temperature and humidity fluctuations, which can adversely affect embryo development. Only open the incubator when necessary, such as for candling or egg inspections.
Candling: Regularly candle the eggs to monitor embryo development and detect any potential issues. Candling involves shining a bright light through the egg to observe the contents. This process allows you to identify viable eggs, track development progress, and spot any abnormalities or signs of infertility.
Egg inspections: Periodically inspect the eggs for any signs of damage, contamination, or abnormalities. Remove any eggs that show signs of spoilage, as they can negatively affect the health of the other developing embryos.
Maintaining optimal conditions: Continue to monitor and maintain proper temperature and humidity levels throughout the incubation period. Make necessary adjustments to the incubator's settings or water levels to ensure a stable environment for the growing chicks.
Record keeping: Keep a record of important observations and events, including candling results, temperature and humidity logs, and any abnormalities or concerns. This information can help troubleshoot issues and improve future incubation processes.
By providing consistent care and monitoring, you can give your chicks the very best start in life!
© weknowpets 2023